
Starting with the basics
There is a wide variety of equipment for Instrumental Insemination on the market. It can be difficult to know what is required to start and what consumables you need. Here we will talk through some of the equipment available and its use.
Basic Equipment
The basic equipment required for Instrumental Insemination is a unit and a microscope. You will also require a number of consumables and a means of cleaning your equipment.
Microscope
A stereo microscope is needed for Instrumental Insemination. This will provide you with adequate magnification to accurately see what you are doing. There are many stereo microscopes available so it is best to choose carefully.

Zoom
The zoom required for II is between 7x and 20x. Because of variations in procedures carried out and everyone’s eyes, we would recommend a microscope with variable zoom. This is where the zoom level can be altered on a wheel within a set range. Variable zoom allows for smoother working especially when changing from semen collection to insemination.
Working distance is another consideration when picking a microscope. There needs to be enough room between the unit and microscope to allow you to manoeuvre without contaminating the unit. most stereo microscopes have a working distance of 100mm between the objective lens and focus object. Whilst this is adequate for II, it is tight. The use of a 0.5x objective lens can increase this working distance to 165mm. The extra room helps to reduce the risk of contamination and ensures that the unit stays clear of the microscope.
Microscope Stand
The stand of the microscope is an often overlooked factor to consider. As most microscopes are used to examine items resting on the stand, the mounting pole need only be long enough to ensure adequate focusing adjustment above the base. Insemination units can sit high above the base height so often require an extended mounting pole. A mounting pole of around 300mm will provide you with plenty of height to ensure adequate working space above an II unit.
In addition to the mounting pole, the stand base is also a point for consideration. The larger the base, the more stable the microscope will be. There is no need for an illuminated base for II, so it is best to look for a large or heavy base that provides enough room to place you Insemination unit.
Lights
Good illumination is needed for II. The used of LED light rings mounted to the objective lens or LED flexi lights is recommended. LEDs provide a cool light, they do not produce a lot of heat which means that you do not risk drying out the semen or over heating the queen.
Microscope heads
Microscope heads come as binocular or trinocular. A binocular head comes with two eye pieces. This is completely adequate for insemination and the two eye lens will provide a degree of depth perception to aid working. Trinocular heads have an additional lens located behind the eye pieces. This lens is often used to mount a camera. Cameras can be connected to a computer or TV screen.
To ensure that the camera shows the same aspect of what is visible through the eye pieces, the use of a 0.5x C mount is needed. A good quality camera can be used to display the insemination process on a TV or via a computer. If connecting the camera to the computer, most programs will allow you to record or take photos.
Instrumental Insemination Unit
Insemination units have developed massively over the years, each improving on the previous design. Many have become redundant due to being over-complicated or too difficult to use. We offer to styles of insemination unit for sale. These are similar in design to those produced by Schley. This design has widely been accepted as easy to use with a good level of control.
There are many variations of these units on the market. It is important to be critical when choosing an Insemination unit. It is likely that you will only ever need to purchase one. The materials used play an important part in its usability and durability. Many cheap units are manufactured of plastic using 3D printing. These lack adjustment and smooth functioning. The plastic can also degrade when chemically cleaned so ensuring your equipment sterile can be difficult.
Metal units are often manufactured from stainless steel, brass or aluminium. All of these metals offer high durability and are easy to clean. Aluminium to prone to oxidation and if left damp after chemical cleaning can quickly corrode. Stainless steel is recognised across many industries as highly durable and easy to clean. Also, its high resistance to corrosion means that it is long lasting. Our units are manufactured for 304 stainless steel, this is the same grade as medical equipment and food manufacturing equipment.
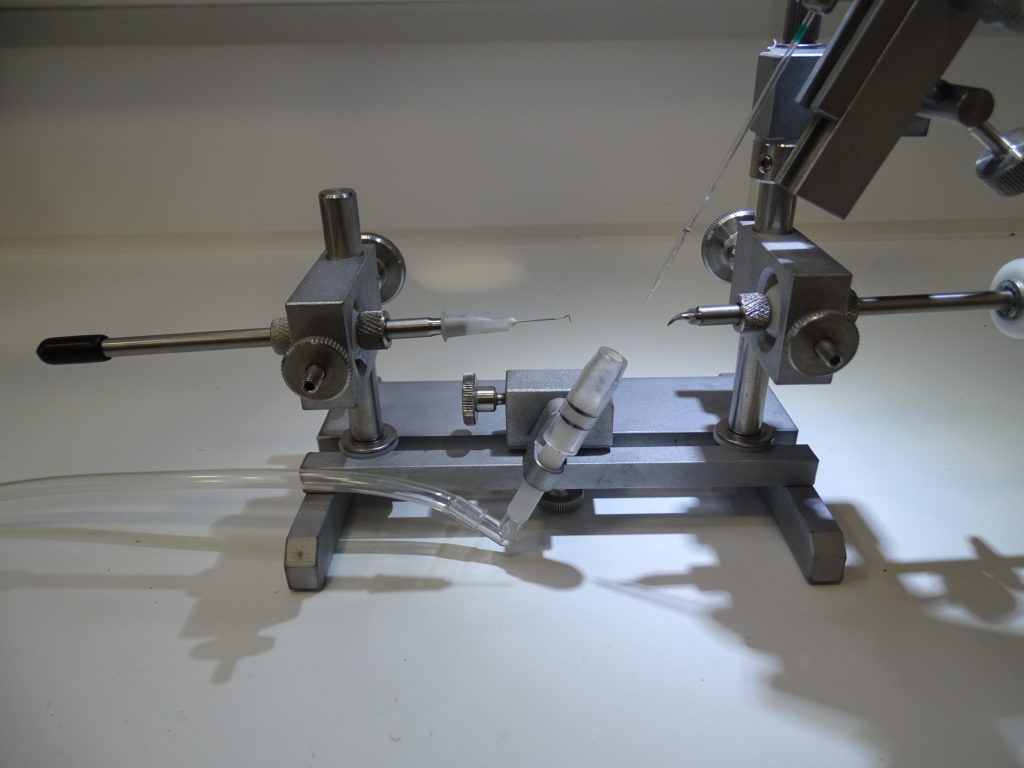
Insemination Unit 1.01
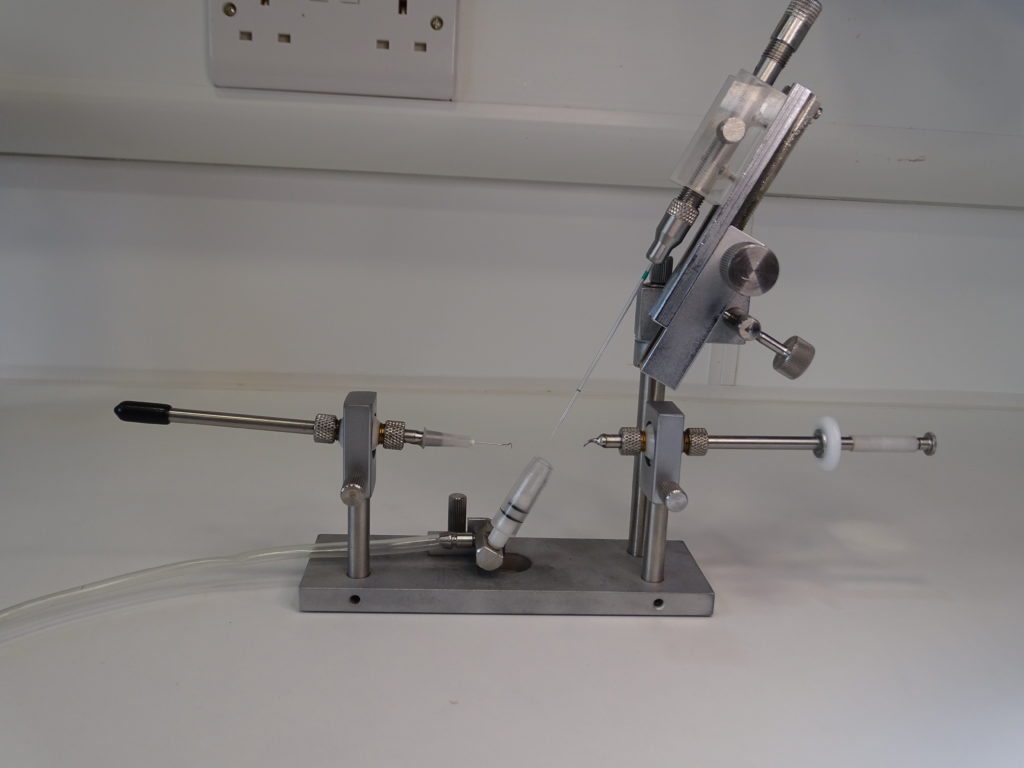
The 1.01 Insemination unit is light weight and easy to use. Although it has smooth operation, there are some adjustment restrictions. The height of the ball joints to hold the probes can not be adjusted. For the majority of queens this is not an issue. However, for some smaller queens it can cause alignment issues and make it tricky to open the queen’s vaginal chamber. If there is excessive downward angle on the probes this can be corrected by lifting the queen holder.
All other aspects of this unit can be adjusted to ensure correct alignment between the queen and insemination tip. As standard, this unit is equipped with a syringe mounted to a slider. When operating the syringe it is important to keep a steady hand as an ill timed movement can cause damage to the queen. The use of a Harbo syringe kit will minimise this risk to the queen and provide smoother operation, there will be more detail on this later.
Overall, the 1.01 Insemination unit is ideal for those wishing to inseminate small to moderate numbers of queens. Its lower cost and compact assembly make it a more accessible unit to many people. The compact design also means that it is compatible with a wide number of microscopes as it sits lower to the stand base.
Insemination Unit 1.02
The 1.02 Unit is of a heavier design and provides complete adjustability. The heavy set base makes it more stable and less likely to be knocked during the insemination procedure. The ball joints can be adjusted in height allowing easier set-up for small queens.
The orientation of the probe ball joints makes this unit more comfortable for prolonged use. Again, it comes with a mounted syringe as standard which can always be upgraded to a Harbo syringe kit later
The heavy stand means that this unit is set higher and it is important that a suitable microscope stand is used as detailed above.
This Insemination unit is ideally suited to those inseminating a moderate to a large number of queens. The high level of adjustability and comfortable operation makes this unit a favourite among researchers and queen breeders.
Consumables
There are a number of consumables required for Instrumental Insemination. Our Units come with all that you need to get started except for Saline solution.
Insemination Tips
Inseminations tips are made from glass and are drawn down from a capillary tube to a fine point. The tip has a hole from 0.13-0.16mm to allow the passage of semen. The tips are normally polished at 90 degrees, however there are various other shapings used. Angular tips have some popularity, though they do increase the tip opening and are more prone to collecting mucus during the semen collection process.
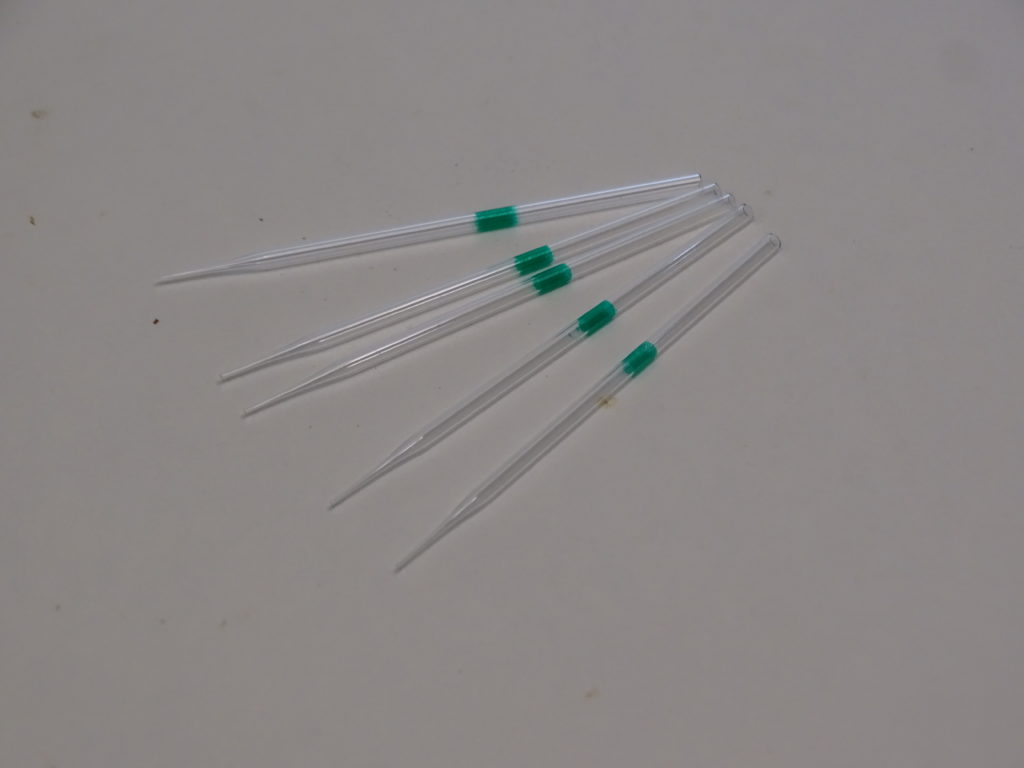
In addition to the tip shape, Insemination tips come in different lengths. The standard length is approximately 80mm for use with a mounted syringe. Standard tips are used to collect semen and inseminate queens in one whole tip. The shorter Harbo insemination tips are around 40mm in length and are joined to a glass cannula. The collected semen is taken into the cannula allowing the Harbo tip to be changed easily if it becomes contaminated.
It is important to clean Insemination tips promptly after use. Semen allowed to dry out can be difficult to remove and will cause contamination issues later. Insemination tips can be washed through using Isopropanol Alcohol and then rinsed using distilled water. The use of an ultrasonic water bath can help clean the tips though care should be taken to protect the drawn tips as the vibration can cause it to break if it knocks into something else.
Tips can be sterilised before use by washing through with isopropanol and then rinsing with distilled water. They can also be heated to around 90 degrees for 15-30 minutes in a pressure cooker or water bath. When handling a sterilised tip, ensure that you do not contaminate it by bringing the drawn end into contact with a contaminate.
Syringe Body
The syringe body goes inside the Stainless steel syringe holder. These are often sterilised 1ml syringes with the finger grips removed. It is best practise to change this syringe between batches. It is possible to sterilise them, however high temperatures can cause the plastic to warp and the syringe to become jerky during operation.
The rubber plunger from the syringe can be removed and mounted to the threaded syringe holder plunger. This plunger provides a high degrees of accuracy, it is actuated by rotating with allows controlled collection and delivery of semen. As with the syringe body, it is best practice to replace the rubber plunger between sessions.
Squeeze Seal
Squeeze seal is silicone tubing cut in short length which when compressed on the insemination tip makes a secure seal. This is used when joining the Insemination tip to the syringe holder. The tip in inserted into the holder end into a short length of squeeze seal. When the syringe holder end is tightened it compresses the seal against the syringe body tip and around the insemination tip. This makes a tight seal between the insemination tip and syringe. This section of squeeze seal should be replaced often. It can be sterilised between use but will degrade over time.
Saline Solution
Isotonic Saline is used as the main medium during semen collection and insemination. It has no harmful effect on the semen and allows for smooth collection and delivery. Prior to collecting semen, the syringe and insemination tip should be filled with fresh saline. It is important to ensure all air bubbles are removed from the syringe and tip after filling. An air gap is then made in the tip then approximately 5mm more saline is collected. Another air gap is then collected before the collection a semen. A small amount of saline can be used to assist the start of semen collection.
Syringe Bacterial filter

A bacterial filter can be used to ensure that the saline used is sterile. Saline is drawn into a syringe, a 5ml syringe is normally suitable. A bacterial filter is then added to the syringe tip and the saline is dispensed through it. A blunt needle tip is ideal to control the rate of dispensing. A drop can be dispensed and picked up with the insemination tip. This greatly reduces any risk of contamination. It is good practice to change the filter between sessions, they can not be sterilised and become clogged during excessive use.
Swabs
These are used to help clean the insemination tip periodically during semen collection and insemination. It is important to only pick them up from one side and discard after use. They can present a high risk of contamination if not disposed of promptly. It is important to keep fresh Swabs clean and away from potential contaminants.
Ventral Hook, Hand Probe and Sting Forceps
The Ventral hook, hand probe are sting forceps are used to open the queens vaginal chamber. If well looked after these will last many years. However, an inadvertent movement can result in them becoming damaged. The Ventral hook and hand probe are mounted to probe handles and are easy to clean and sterilise. The sting forceps can take more time to clean and may need readjusting after.
Queen Holder and Back-up Tube
Again, with good care these can last many years. As they are manufactured of acrylic they are easily damaged when subjected to heat. They can also become damaged when cleaning with chemicals and may require periodic replacement.